How to Fix Microphone Not Working for Mac Computers (Free Guide)
Rudy E.
Issue:How to Fix Mac Microphone? It's not working...
My Mac microphone seems to be not working. I had a meeting earlier today and my teammates couldn't hear me. I also tried to create a voice record file but there's no sound.
A microphone is an important part of any communication gadget, especially for Mac Computers. For Mac, a microphone is important because it is used to access Siri, communicate through calls, and create voice and video recordings.
Mac comes with a built-in microphone and you can connect external microphone devices to it as well. You can use the microphone of your earphones or other cabled microphone devices. All of them work well.
But the thing is, microphone devices can malfunction too. Issues occur commonly because of damage in the microphone hardware, software issues, and configuration errors.
If you are not sure about the reason for your microphone issues, here are some steps on how to identify microphone issues and fix them.
Step by Step Process to Identify and Fix Microphone Issues for Mac:
Identify and Test the Microphone Device that You are Using for Your Mac
Once you discover that your microphone isn’t working and if you have other mics connected to your Mac, the first thing you can do is to recheck which of the said microphones are enabled. The way to do it is by talking to Siri.
Through this method, you will be able to determine whether the built-in mic or the external mic doesn’t work. Or if it doesn’t work with a specific site or application only.
If Siri works, it means that your microphone is working well and the issue is with the application settings. If Siri doesn’t respond, it’s either your Mac has a problem or the microphone itself. If you are using an external microphone and Siri doesn’t respond, then the problem is with the external microphone.
Fix and Assign Permissions
Once you find out that your Mac and its microphone are working well, then the issue could lie on the application that you are using it with.
If it doesn’t work just with a specific application, try to check first if the necessary permissions for both the app and your Mac are enabled.
Here are the steps you should follow to check and give microphone access permission:
- Click the Apple logo on the menu bar.
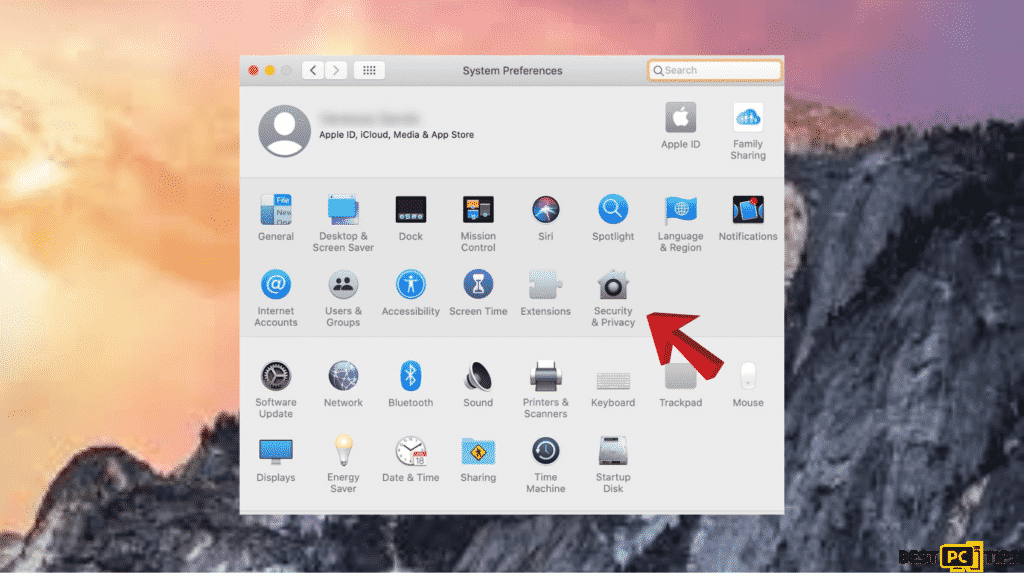
- Select “System Preferences”.
- Then click “Security & Privacy” settings.
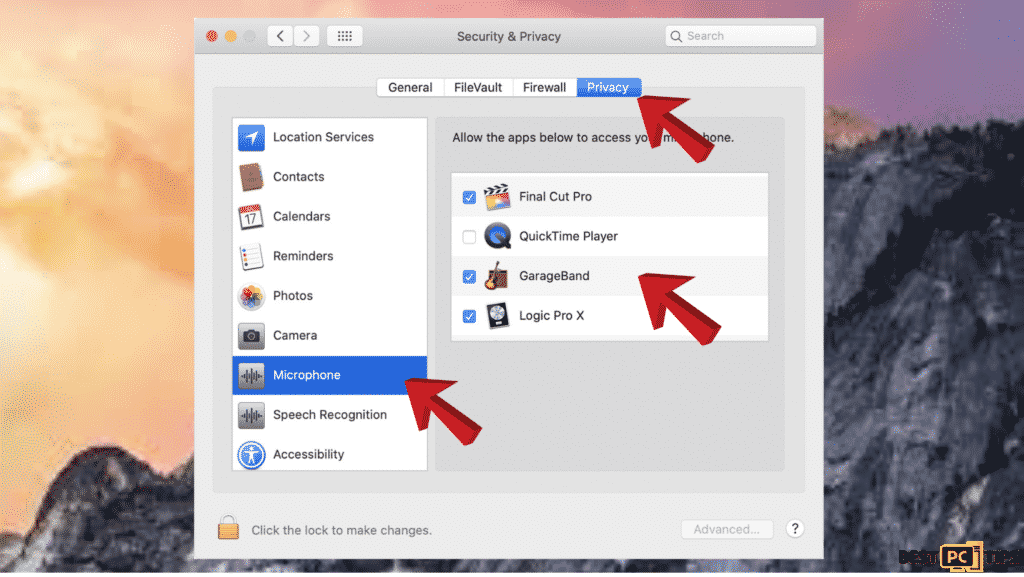
- Go to the “Privacy” tab.
- Then, choose “Microphone”.
- Locate the application where you try to use the mic on the right side then tick the box next to it to allow microphone access.
Microphone Permissions Reset (For Catalina/Mojave)
You can also try resetting all of your microphone permissions (if your Mac runs through macOS Catalina or macOS Mojave) through this Terminal command:
- Go and launch the “Terminal” app.
- Enter the command: sudo rm -rf ~/Library/Application\Support/com.apple.TCC
- Put your Mac’s password. (Note: You will not see your password in the Terminal window.)
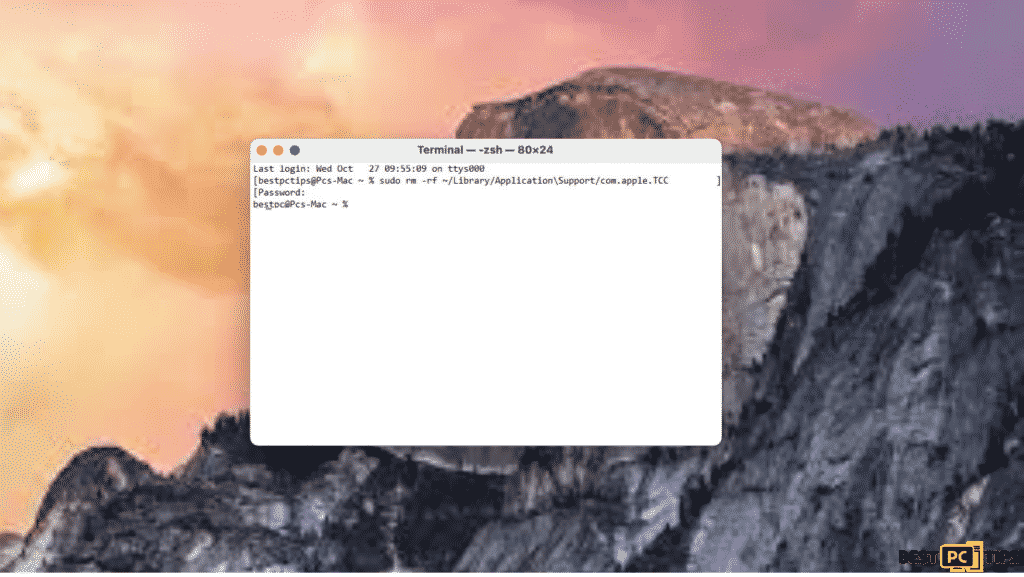
- You can then reboot your Mac once the command is executed.
- Then go to “Security & Privacy” settings and allow the mic permissions and follow the steps “Fix and Assign Permissions”. After these steps, check if your microphone is already working.
Uninstall and Reinstall the Application that You are Using
If there are still issues with your microphone while using the app after you enable all of the needed permissions, we suggest checking the application’s voice and sound settings. If there’s nothing wrong with the settings, delete the said application and reinstall it.
Here are the steps to delete the application:
- Launch Finder and click the “Applications” folder.
- Hover over the app and right-click your mouse.
- Then click “Move to Trash” once the menu is displayed.
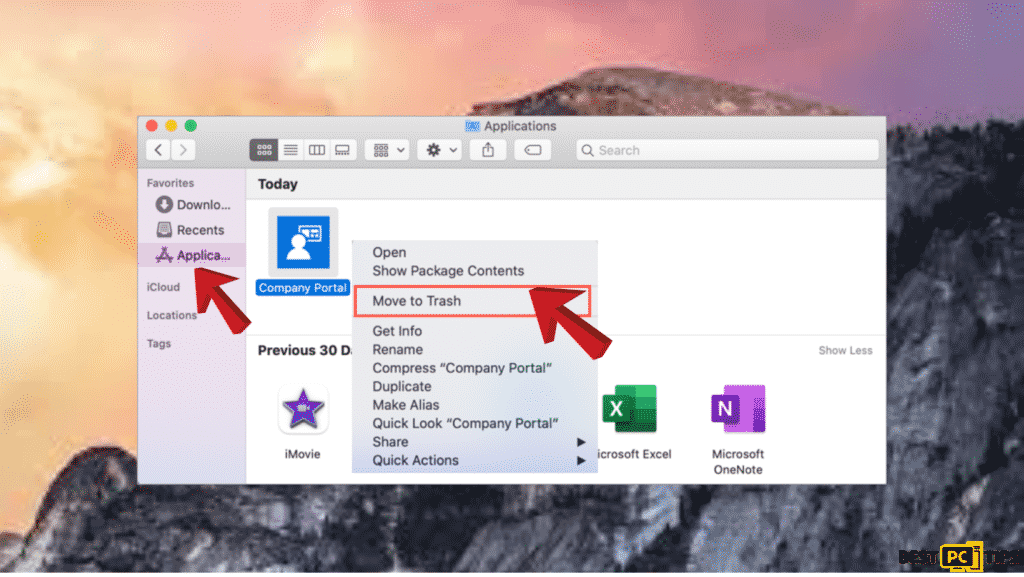
Make sure to empty the trash before reinstalling the app.
Reboot Your Mac
Once you identified that the issue is with your Mac, you should start to reboot it. Rebooting your Mac will also refresh it and will help in killing glitches and minor bugs that could cause microphone issues.
Modify the Microphone Sound Input Settings
Configuration problems with your Mac’s sound input are a common cause of microphone problems. Before doing complicated steps, you check the said settings and modify them.
- Click the Apple logo located on the menu bar.
- Select “System Preferences”.
- Click “Sound”.
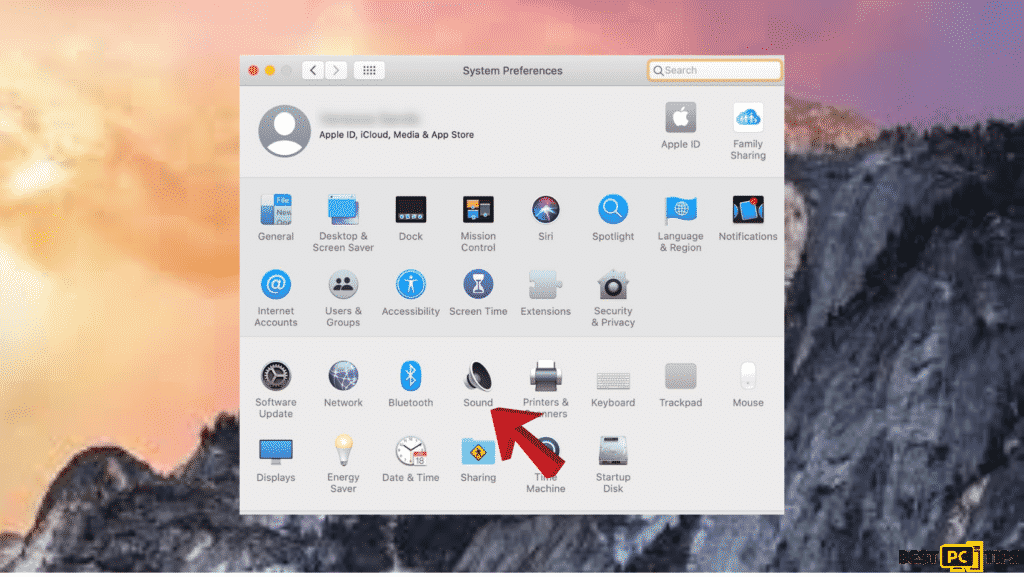
- Go to the “Input” tab
- Find your microphone.
- Then try to speak and check if the bars near “Input Level” fill up. If there’s only a few of them filled up then it’s okay.
- You can also modulate the “Input Volume” by increasing the value for a better response.
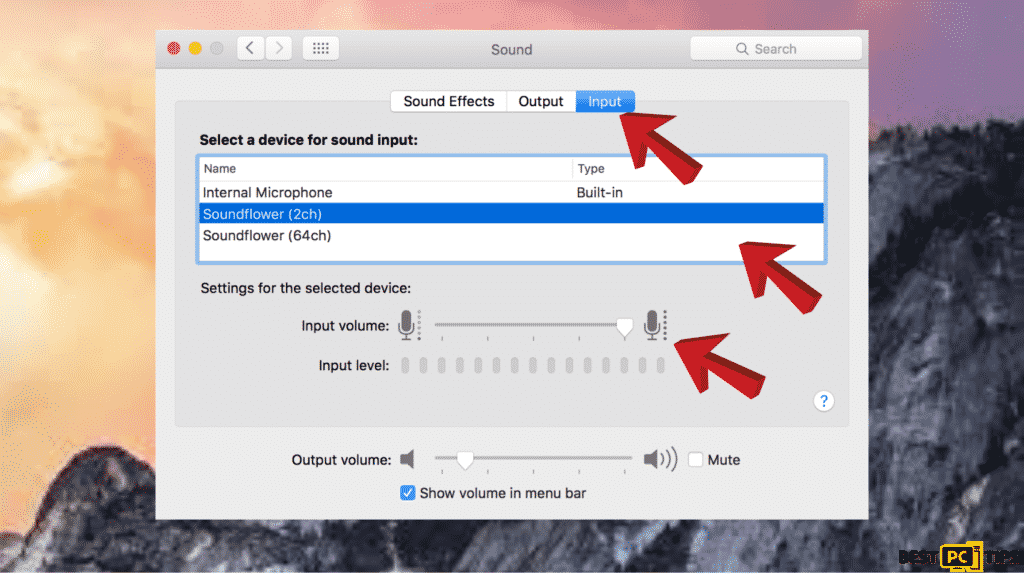
Turn On Dictation
Another thing you can try is enabling Dictation.
To turn on Dictation, here are the steps you should follow:
- Click the Apple logo from the menu bar.
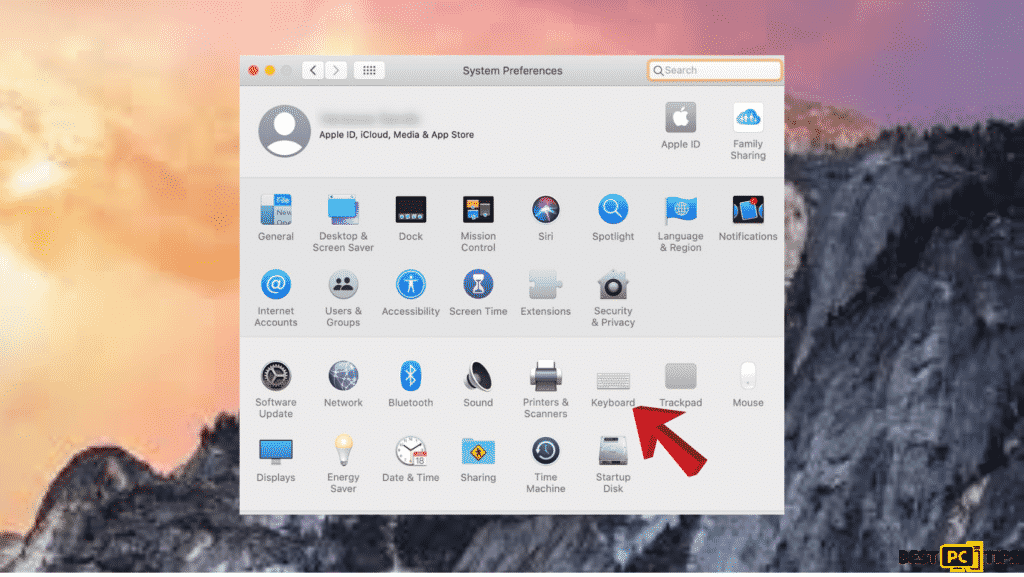
- Next, go to “System Preferences”.
- Then hover over the “keyboard settings” icon and click it.
- Go to the “Dictation” tab.
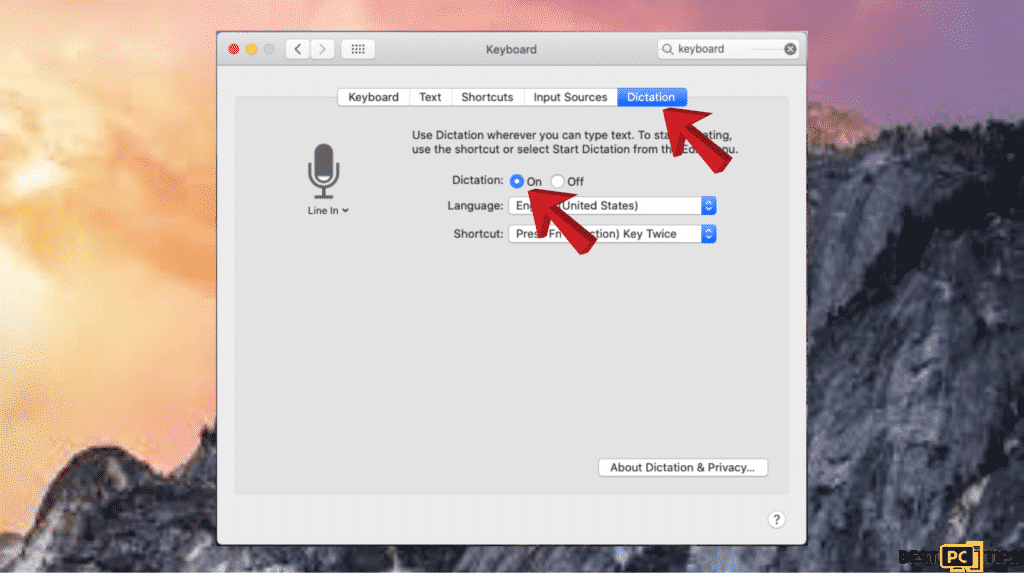
- Align with the “dictation”, tick “On”
- Then, click on “Enable Dictation”.
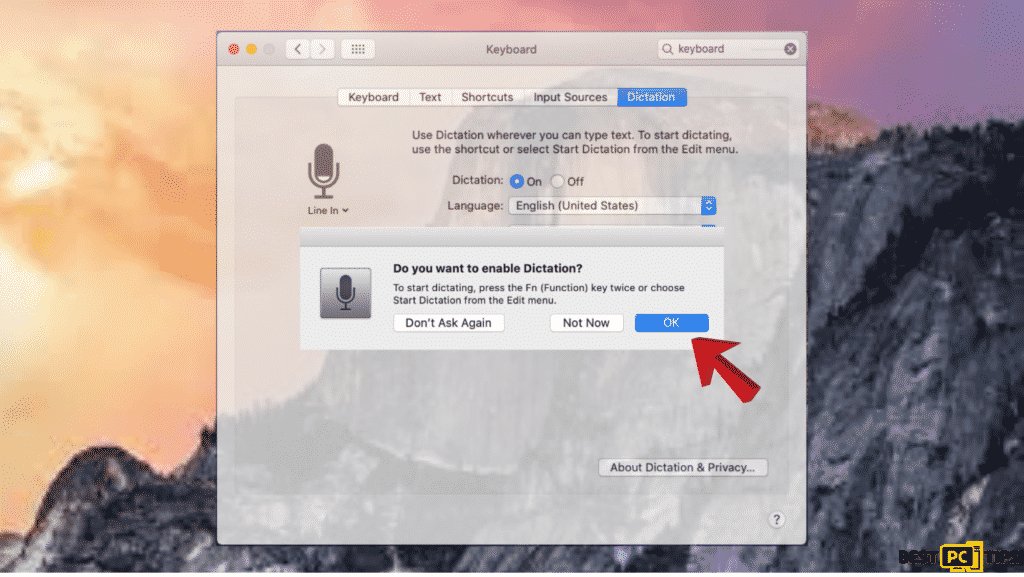
After following these steps, try to use your mic by accessing Siri and checking if it will respond.
Reset PRAM
PRAM is also responsible for sound settings so resetting it might also help in fixing your mic if all of the other steps don’t work for you:
- Shut down your Mac and turn it back on.
- Once it is on, press the Option + Command + P + R keys on your keyboard and hold them for a while. If your Mac has a T2 chip, you should hold the keys until it restarts. You’ll see the Apple logo appears twice.
If you are using an old model, hold the keys until you hear the second start-up sound. Once your Mac boots, test if your microphone is working.
Final Words
A microphone is essential for lots of computer tasks, especially for recording tutorial videos and when communicating with people. We know the pain of dealing with microphone issues we hope that we helped you through this article.
If you want a hassle-free Mac microphone fix, we recommend downloading iolo System Mechanic.
iolo System Mechanic® — is a patented PC & MAC repair tool & the only program of its kind. Not only it’s a registry fix, PC optimizer, or an anti-virus/malware remover – The iolo System Mechanic® technology reverses the damage done to Windows or Mac, eliminating the need for time-consuming reinstallations & costly technician bills.
It is available for FREE. Although, for some more advanced features & 100% effective fixes you may need to purchase a full license.
If the Microphone for Mac Errors Error is still not fixed — don’t hesitate and contact us via email, or a Facebook messenger (the blue ‘bubble’ on the bottom-right of your screen).
Offer
iolo System Mechanic® — is a patented PC & MAC repair tool & the only program of its kind. Not only it’s a registry fix, PC optimizer, or an anti-virus/malware remover – The iolo System Mechanic® technology reverses the damage done to Windows or Mac, eliminating the need for time-consuming reinstallations & costly technician bills.
It is available for FREE. Although, for some more advanced features & 100% effective fixes you may need to purchase a full license.
If the Microphone for Mac Errors Error is still not fixed — don’t hesitate and contact us via email, or a Facebook messenger (the blue ‘bubble’ on the bottom-right of your screen).
