Zpps Ransomware Removal: How to Uninstall the Latest Virus From the Djvu Family?
Lory K.
Issue:HELP! MY FILES ARE LOCKED!
I need your help please! Can I decrypt my files without paying the ransom to Zpps Ransomware operators?
In a chilling revelation that has sent shockwaves through the digital landscape, cybersecurity experts have uncovered the evil workings of a new and insidious ransomware virus strain known as “Zpps.” This sinister extortion scheme has quickly gained notoriety for its sophisticated tactics, targeting individuals and organizations ruthlessly. As the dark web marketplace for ransomware continues to evolve, the Zpps virus has emerged as a formidable threat, leaving victims grappling with devastating consequences and authorities racing against time to unravel its cryptic origins. In this article, we delve deep into the inner workings of Zpps virus ransomware, exploring its methods, motives, and the harrowing implications it poses for cybersecurity in the modern age.
Understanding Zpps Ransomware: How Did It Sneak Into Your Computer?
The rise of ransomware attacks has become a pressing concern for individuals and organizations alike, leaving victims grappling with the aftermath of encrypted files and extortion demands. But how exactly does ransomware manage to infiltrate our computer systems undetected? Understanding ransomware’s path to gaining access is crucial in fortifying our defenses against these malicious threats. In this article, we explore the intricate methods employed by cybercriminals, from deceptive emails and malicious attachments to compromised websites and exploit kits.

By shedding light on these tactics, we aim to empower users with the knowledge needed to bolster their cybersecurity practices and stay one step ahead in the ongoing battle against ransomware attacks.
What Is Zpps Ransomware? How To Prevent Future Infections?
Cybersecurity researchers discovered The Zpps ransomware during a routine inspection of new malware submissions to VirusTotal. Classified as a member of the Djvu ransomware family, Zpps operates by encrypting files and appending the “.zpps” extension to their filenames. For example, a file named “1.jpg” would be altered to “1.jpg.zpps,” and “2.png” would become “2.png.zpps” after the encryption process. Upon completion of the encryption, the ransomware generates a ransom note named “_readme.txt.”
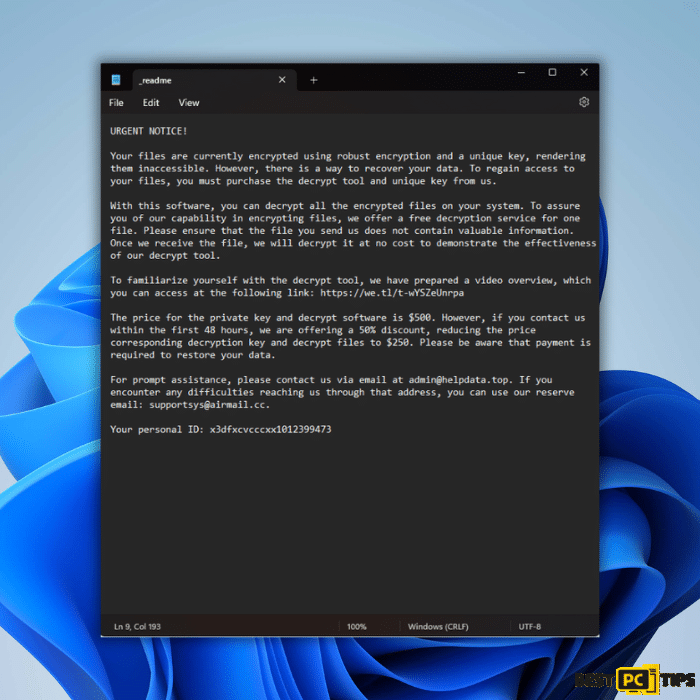
Text Present in a ransomware’s text file (“_readme.txt”):
“URGENT NOTICE!
Your files are currently encrypted using robust encryption and a unique key, rendering them inaccessible. However, there is a way to recover your data. To regain access to your files, you must purchase the decrypt tool and unique key from us.
With this software, you can decrypt all the encrypted files on your system. To assure you of our capability in encrypting files, we offer a free decryption service for one file. Please ensure that the file you send us does not contain valuable information. Once we receive the file, we will decrypt it at no cost to demonstrate the effectiveness of our decrypt tool.
To familiarize yourself with the decrypt tool, we have prepared a video overview, which you can access at the following link: https://we.tl/t-wYSZeUnrpa
The price for the private key and decrypt software is $500. However, if you contact us within the first 48 hours, we are offering a 50% discount, reducing the price corresponding decryption key and decrypt files to $250. Please be aware that payment is required to restore your data.
For prompt assistance, please contact us via email at [email protected]. If you encounter any difficulties reaching us through that address, you can use our reserve email: [email protected].
Your personal ID: “
Before we dive into this Zpps ransomware removal guide – we always highly advise using a reliable Virtual Private Network (we recommend CyberGhost VPN –> get our special 83% off deal here).
It will protect your online privacy as well as secure your PC from dangerous websites and malware that might be causing various PC issues in the first place.
Here are some short tips on how to prevent future infections before we dive into the full Zpps removal steps.
Exercise Diligence with Incoming Emails
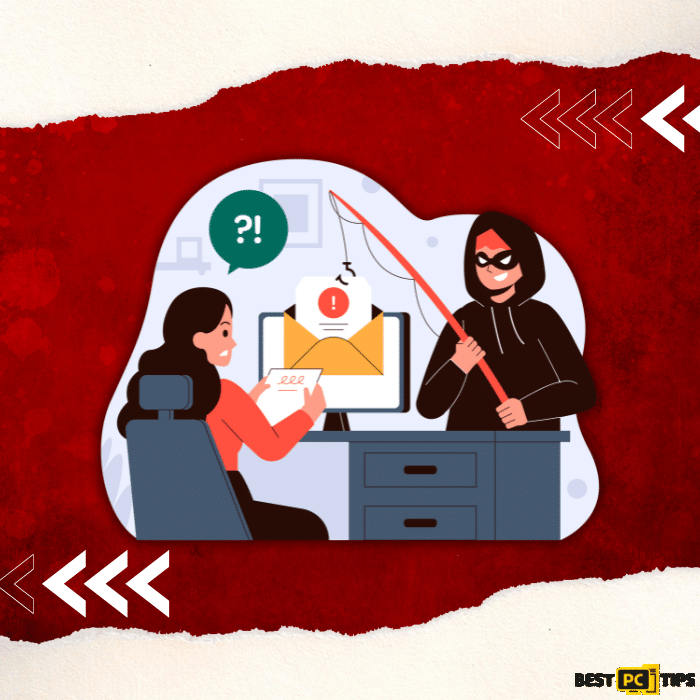
Exercise caution when dealing with emails, especially from unfamiliar or suspicious sources. Refrain from opening attachments or clicking on links within dubious or irrelevant emails, as these may be gateways for ransomware infiltration. Verify the sender’s authenticity before engaging with any potentially harmful content.
Download Software from Official and Verified Sources Only
Stick to trusted and verified sources when downloading software, applications, or media. Utilize official websites or reputable platforms to ensure the integrity and safety of your downloads. Beware of unofficial or freeware sites, peer-to-peer (P2P) networks, or other untrustworthy channels, as they may harbor hidden dangers in other malicious programs or software.
Beware of Illegal Activation Tools and Fake Updates

Avoid the temptation of using illegal and malicious software and activation tools, often referred to as “cracks.” These tools violate licensing agreements with malware developers and expose you to the risk of unwittingly installing ransomware. Additionally, be cautious of fake software update notifications. Always verify updates through official channels provided by legitimate developers to avoid falling victim to malware-infested impostors.
Maintain Reliable Antivirus Protection
Install a reputable and up-to-date antivirus software solution. Ensure your antivirus program is equipped with robust ransomware detection and prevention capabilities. Regularly update your security software to stay ahead of emerging malware threats. Perform scheduled system scans to identify and eliminate potential malware infections, safeguarding your files and system integrity.
Backup, Backup, Backup
Establish a reliable backup strategy to protect your critical data. Regularly back up your files and store them in separate, disconnected locations. Consider utilizing external hard drives, cloud storage services, or other secure backup solutions. This practice will allow you to restore your files during a ransomware attack, mitigating the impact of data loss.
Stay Educated and Vigilant
Stay informed about the latest ransomware trends, techniques, and prevention methods. Stay vigilant while browsing the internet, scrutinizing websites, downloads, and online offers for suspicious or fraudulent elements. By cultivating a vigilant mindset and staying educated, you enhance your ability to detect and avoid potential ransomware threats.
In the unfortunate event that your system falls victim to ransomware, immediate action is crucial. We recommend running a thorough scan using trusted antivirus software, such as Combo Cleaner Antivirus for Windows, specifically designed to detect and eliminate ransomware threats. Acting swiftly can help minimize the damage and increase the chances of successful mitigation.
By implementing these protective measures and maintaining a proactive stance, you strengthen your defenses against ransomware and contribute to a safer digital environment for yourself and others. Remember, the fight against ransomware is a collective endeavor, and together, we can thwart the ambitions of cybercriminals and preserve the sanctity of our digital world.
There’s Hope: Solutions for Restoring Encrypted Data from Zpps/Djvu Ransomware
In the relentless pursuit of reclaiming encrypted data from Djvu ransomware, victims have reported success using alternative tools and techniques. Here are some notable options to explore in your quest for data restoration:
PhotoRec by CGSecurity:
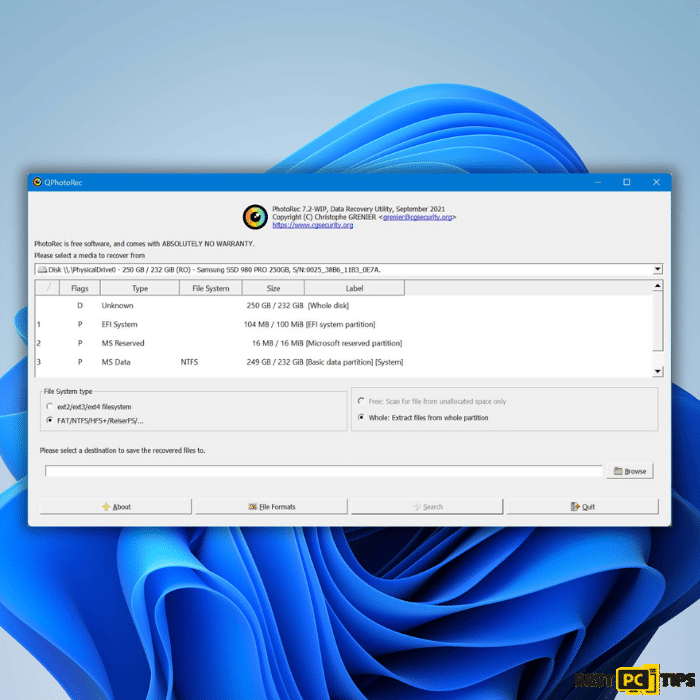
Victims have partially recovered encrypted data using the PhotoRec tool CGSecurity’s Christophe Grenier developed. This specialized tool, available for download from CGSecurity’s official website, is renowned for its data recovery capabilities. While Djvu ransomware encrypts only a portion of the file, PhotoRec can potentially decrypt software to restore the unencrypted parts of recovering files, making it particularly useful for audio and video files. Although the initial portion of the victim’s encrypted files may remain inaccessible, the rest can often be salvaged, offering a glimmer of hope.
Media_Repair by DiskTuna:
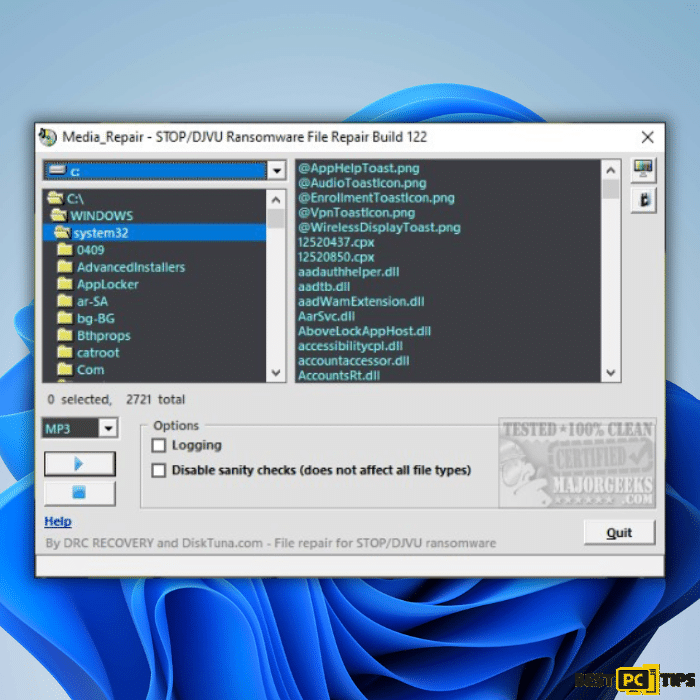
For those dealing specifically with audio and video files affected by Djvu ransomware, the Media_Repair tool developed by DiskTuna proves invaluable. This user-friendly and completely free tool enables users to restore corrupted media and restore encrypted files themselves. DiskTuna’s website provides a user manual and a direct download link, empowering victims with a straightforward solution for recovering essential audio and video data.
G DATA’s “Vaccine” against Djvu Ransomware:
In the fight against Djvu ransomware, G DATA has released a preventative measure known as the “vaccine.” This innovative tool impedes encryption, protecting your data from falling victim to Djvu ransomware. While the vaccine may not prevent the malware from entering your system or carrying out other unwanted actions, it is an effective barrier against data encryption. The vaccination tool can be downloaded from the designated GitHub page, further bolstering your defenses against this particular strain of ransomware.
By leveraging these alternative solutions, victims can expand their arsenal of recovery tools and explore potential avenues for data restoration. Remember, every success story sheds light on the resilience and ingenuity of individuals and organizations dedicated to combating ransomware.
In your journey to reclaim your encrypted data, it is advisable to consult with trusted cybersecurity professionals and explore multiple avenues for recovery. While these tools offer hope, the unique nature of each ransomware incident calls for personalized approaches and tailored solutions.
Stay vigilant, be proactive, and let the pursuit of data restoration serve as a rallying cry against the ransomware threat. Together, we can dismantle the barriers that stand between us and the recovery of our invaluable digital assets.
Eliminating the Zpps Ransomware: Swift and Efficient Removal in 7 Steps
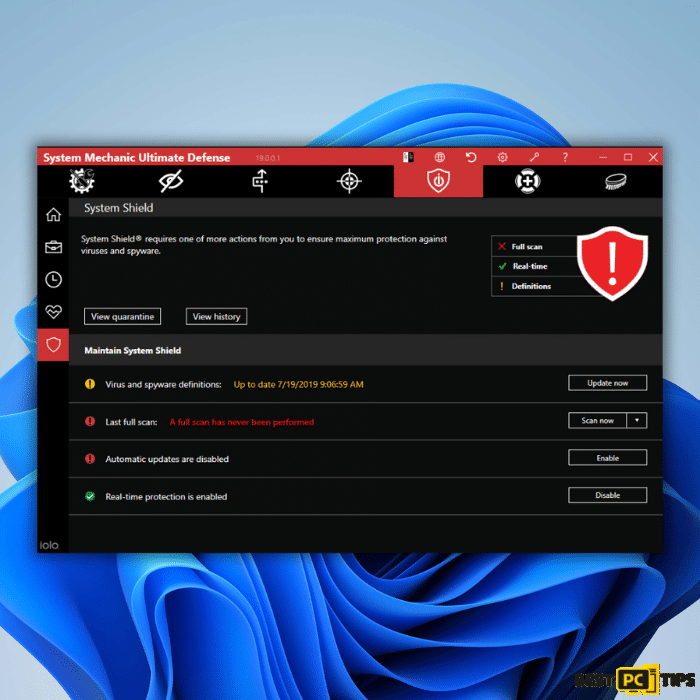
When faced with the formidable Zpps ransomware virus, acting swiftly to remove this malicious software threat from your system is crucial. While manual virus removal can be complex and time-consuming, there is a recommended solution for instant and automatic malware removal: iolo System Mechanic.
iolo System Mechanic is a professional-grade automatic malware removal tool designed to eradicate various types of malware, including the Zpps ransomware. Leveraging its advanced capabilities, iolo System Mechanic offers a streamlined and efficient approach to eliminating this digital menace from your computer.
To initiate the removal process and safeguard your system from further harm, follow these steps:
Download iolo System Mechanic:
Visit the official website of iolo System Mechanic to acquire this professional automatic malware removal tool. Ensure you obtain the legitimate version of anti-malware software from a trusted source to guarantee its effectiveness.
Install iolo System Mechanic:
Execute the installation process, following the provided instructions. Respond to any prompts or options presented during the installation to ensure optimal configuration.
Run a Full System Scan:
Launch iolo System Mechanic and initiate a comprehensive system scan. This powerful tool will meticulously examine your system, identifying and eliminating any instances of the Zpps ransomware or other malware.
Review and Remove Detected Threats:
Once the scan is complete, iolo System Mechanic will provide a detailed report of any identified threats. Take the time to review the results carefully, ensuring that all identified threats, including the Zpps ransomware, are selected for removal.
Execute the Removal Process:
With the threats selected, proceed to initiate the removal process. iolo System Mechanic will methodically eliminate the identified malware from your system, leaving it cleansed and protected.
By entrusting the task of the Zpps ransomware virus removal to iolo System Mechanic, you can enjoy the benefits of an automatic and efficient approach, sparing yourself the complexities and potential pitfalls of manual virus removal.
Remember to stay vigilant in your digital practices, maintain up-to-date security software, and exercise caution when interacting with suspicious files or websites. Together, we can fortify our defenses and combat the ever-evolving threats of ransomware, ensuring the safety and integrity of our digital environments.
STEP 1. Reporting Ransomware to Authorities

When confronted with a ransomware attack, taking immediate action is crucial to mitigate its impact and ensure the best chance of resolving the situation. One of the first steps that should be taken is reporting the incident to the relevant authorities. Reporting ransomware attacks serves multiple purposes, including seeking professional assistance, aiding ongoing investigations, and contributing to combating cybercrime. Law enforcement agencies and cybersecurity organizations have the expertise and resources to investigate these incidents and potentially apprehend the perpetrators. By reporting the ransomware attack promptly, victims protect themselves and contribute to the collective defense against these evolving threats.
In this step, we delve into the importance of reporting ransomware to authorities and guide effectively navigating this process, ensuring a swift response and potential resolution.
STEP 2. Isolating the Infected Device

When dealing with a ransomware attack, one of the crucial steps is to isolate the infected device to prevent further damage. Here’s how you can effectively isolate the infected device:
- Disconnect from the network:
Unplug the Ethernet cable from the infected device or disable the Wi-Fi connection. This step will sever the device’s connection to the internet and prevent the ransomware from spreading to other devices on the network. - Disable automatic syncing:
If cloud storage or file synchronization services are enabled, such as Dropbox or Google Drive, ensure they are turned off on the infected device. This prevents the ransomware from spreading to the cloud and affecting your synced files. - Disconnect external storage devices:
Unplug any external storage devices, such as USB or hard drives, from the infected device. Ransomware can target and encrypt files on connected storage devices, so disconnecting them is crucial to prevent further data loss. - Disable shared network drives:
If the infected device is connected to a network with shared drives or folders, disconnect from those shared resources. This step helps protect other devices on the network from being compromised by ransomware.
By following these steps, you can effectively isolate the infected device and minimize the risk of the ransomware spreading to other devices or storage locations. Remember to keep the device disconnected until it has been properly cleaned and the ransomware removed.
Isolating the infected computer or device from the internet is critical in containing a ransomware attack. Here’s a detailed guide on how to disconnect an infected computer from the internet:
1: Disconnecting via Control Panel (Windows)
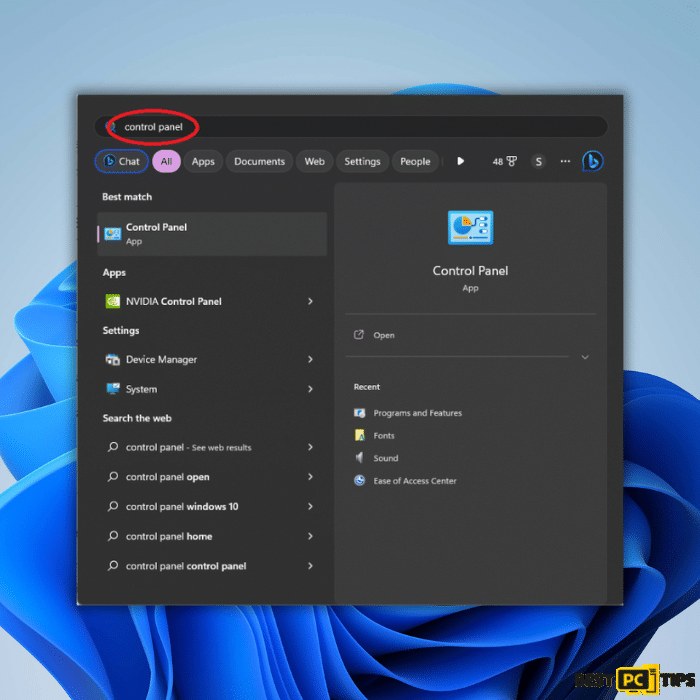
1. Click on the Windows Start button and search for “Control Panel“. Open the Control Panel from the search results.
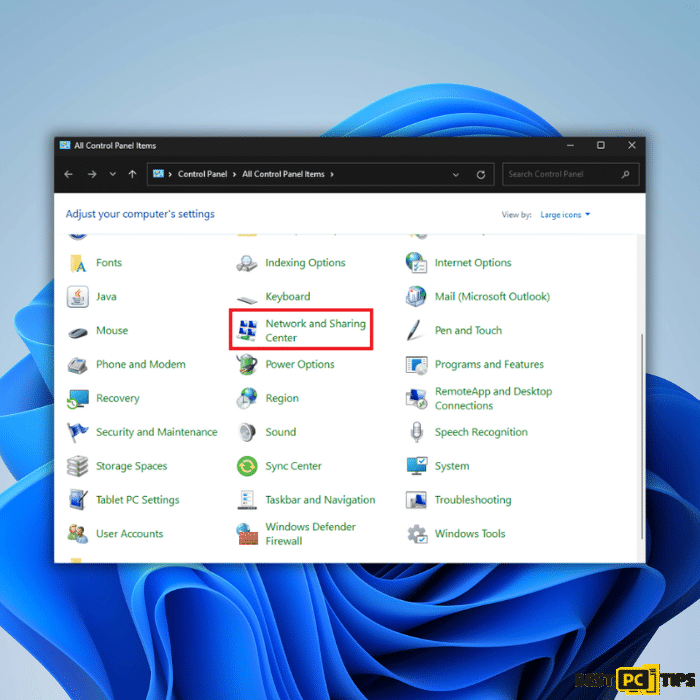
2. In the Control Panel, locate and click “Network and Sharing Center“.
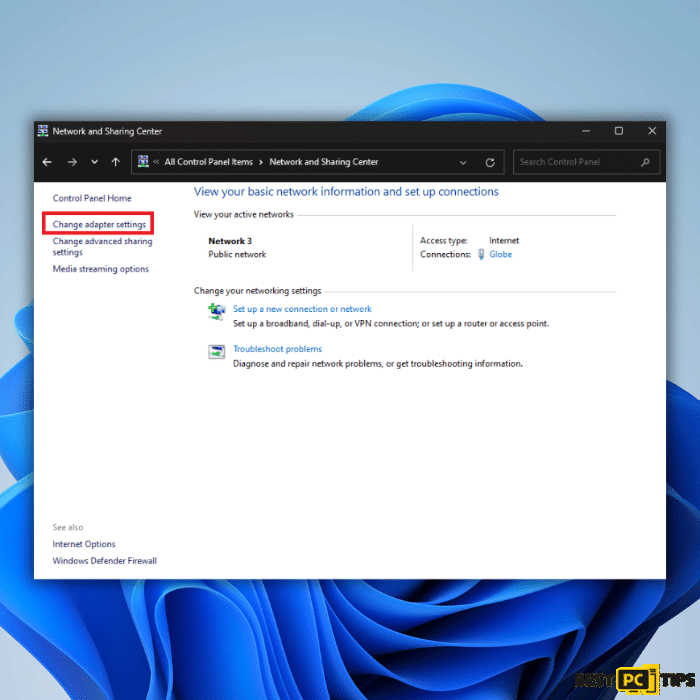
3. Within the Network and Sharing Center, you will find a section titled “Change your networking settings“. Click on the option “Change adapter settings” on the left side of the window.
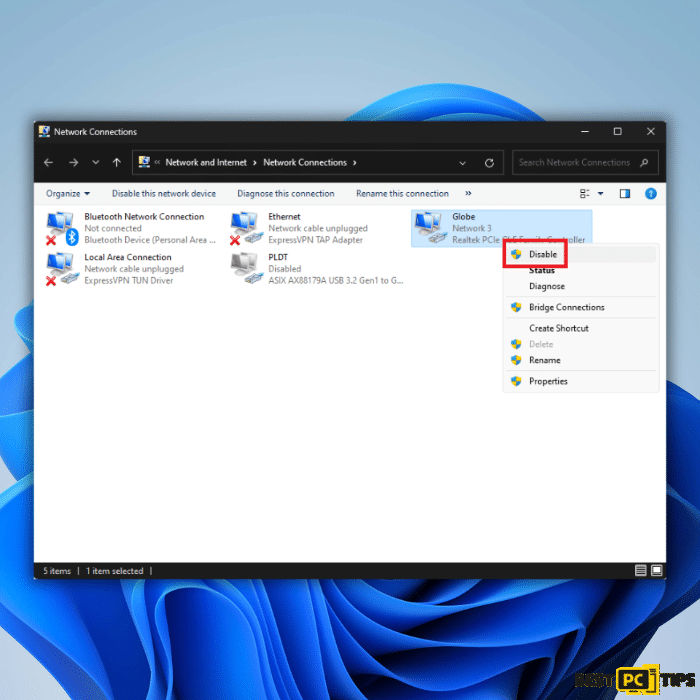
4. This will display the network connections available on your computer. Right-click on each connection that is currently enabled (e.g., Ethernet, Wi-Fi) and select “Disable” from the context menu. This action will disable the network connection, disconnecting your computer from the internet.
5. To re-enable the network connection in the future, right-click on the disabled connection and select “Enable“.
2: Disconnecting via Wi-Fi (Windows)
If your computer is connected to the internet wirelessly, you can disconnect from the network directly from the taskbar.
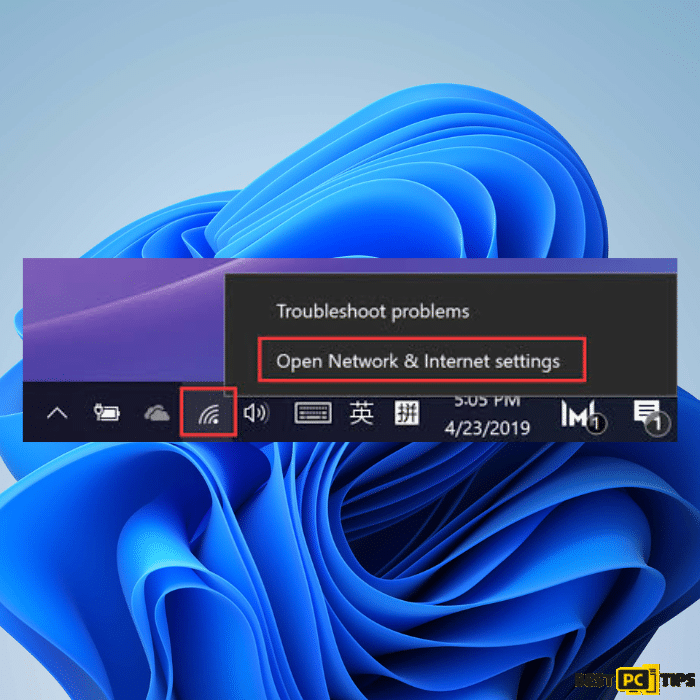
1. Locate the network icon in the taskbar system tray (usually in the bottom-right corner). It resembles a series of bars or a Wi-Fi symbol.
2. Right-click on the network icon to display a context menu. From the menu, select “Open Network & Internet settings“.
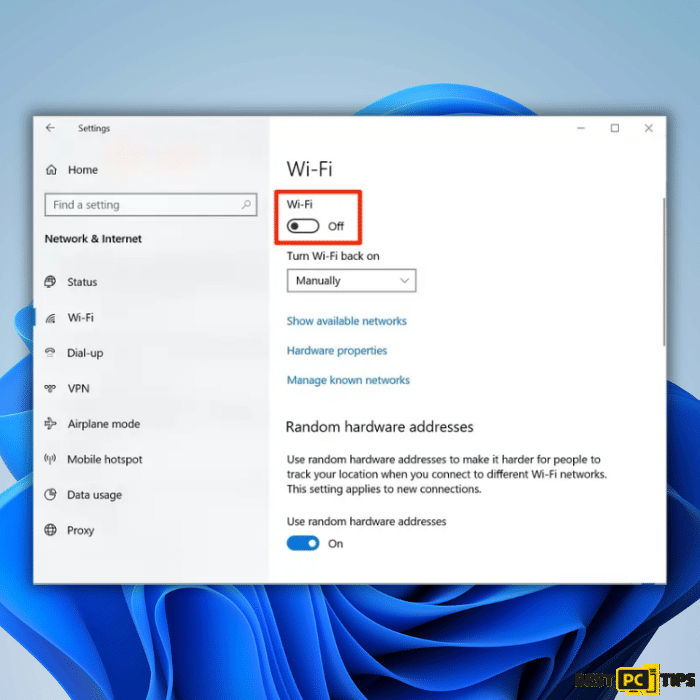
3. In the Network & Internet settings window, select “Wi-Fi” from the left panel.
4. Toggle the switch to the “Off” position under the Wi-Fi section. This action will disable the Wi-Fi connection and disconnect your computer from the internet.
3: Reconnecting to the Internet
To restore internet connectivity, follow the same steps mentioned above and enable the network connection (either through Control Panel or the Wi-Fi settings) by selecting “Enable” or toggling the switch to the “On” position.
By disconnecting the infected device from the internet, you prevent the ransomware from communicating with its command and control servers, limiting its ability to encrypt further files or spread to other devices on the network.
Disconnecting all the Storage Devices
To ensure the ransomware doesn’t also encrypt files and data on connected storage devices, it’s essential to disconnect or eject them properly. Here’s how you can safely disconnect external storage devices from your computer:
1: Safely Ejecting External Storage Devices (Windows)
1. Open “File Explorer” or “My Computer” by clicking the corresponding taskbar icon or pressing the Windows key + E.
2. In the File Explorer window, you will see a list of drives and devices under “This PC” or “My Computer“. Locate the external storage device (such as a USB flash drive or portable hard drive) you want to disconnect.
3. Right-click on the external storage device and select “Eject” from the context menu. This action prepares the device for safe removal.
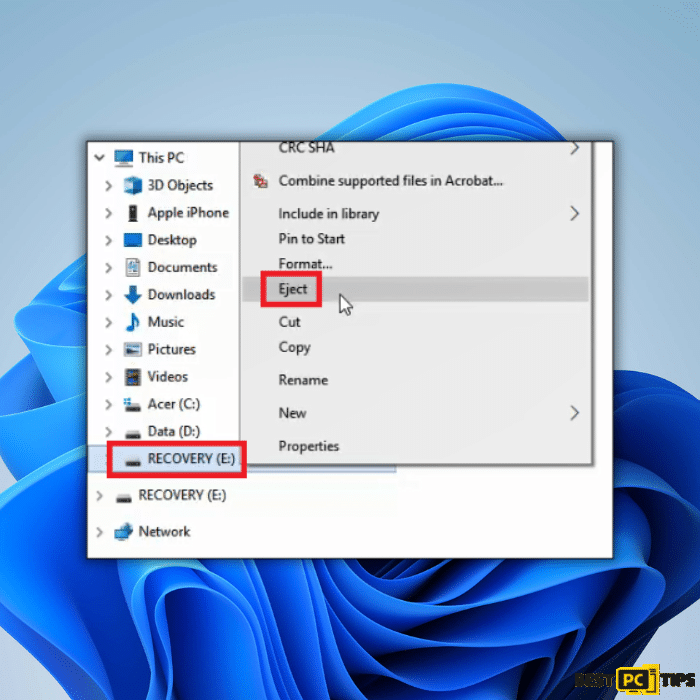
4. Wait for a confirmation message indicating that removing the device is safe. The message may vary depending on your system, but it typically says “Safe to Remove Hardware” or “You can now safely remove the device“. Once you see this message, it means the device has been safely disconnected from your computer.
5. Gently unplug the external storage device from the USB port.
2: Disconnecting External Storage Devices (macOS)
Locate the external storage device connected to your Mac, such as a USB flash drive or external hard drive.
1. In the Finder, click the “Eject” button next to the external storage device in the sidebar. Alternatively, you can right-click on the device and select “Eject” from the context menu.
2. Wait for the device to be ejected and disappear from the Finder. Once it’s no longer visible, unplugging the external storage device from your Mac is safe.
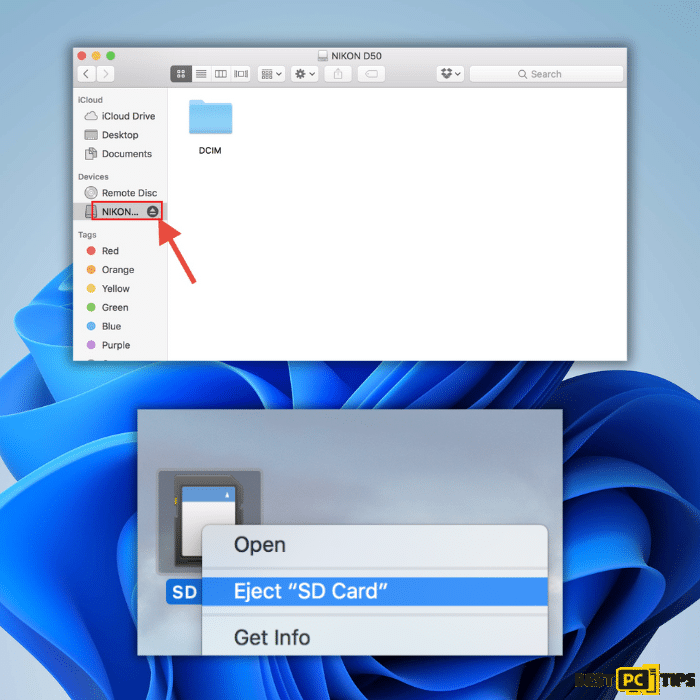
3. By properly ejecting or disconnecting external storage devices, you minimize the risk of data corruption and ensure that the ransomware does not spread to these devices. Remember to follow this procedure for each connected storage device to protect your data effectively.
STEP 3. Identifying the Ransomware Infection
Identifying the ransomware infection is crucial for determining the appropriate response and potential recovery options. Here are some steps to help you identify the ransomware infection:
1: Examine the Ransom Note
Ransomware infections often leave a ransom note that provides instructions on paying the ransom and regaining access to your encrypted files. Analyze the content of the ransom note for any unique characteristics, such as the file name, file extension, or contact information provided by the attackers. This information can help narrow down the ransomware variant.
2: Check File Extensions
Some ransomware infections append specific file extensions to the encrypted files. Examine the file extensions of the encrypted files to identify any patterns or unique extensions associated with the ransomware. This can provide valuable clues about the ransomware variant.
3: Use Online Tools
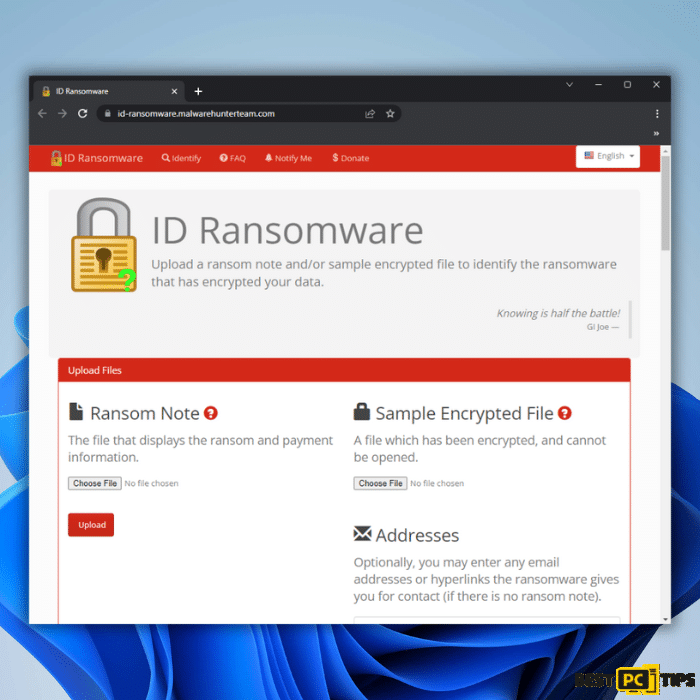
The ID Ransomware website (https://id-ransomware.malwarehunterteam.com/) is a useful resource for identifying ransomware infections. You can upload a ransom note or an encrypted file to the website, and it will analyze the sample to determine the ransomware variant if it is known.
4: Consult Security Researchers and Forums
Security researchers and online forums dedicated to cybersecurity discussions can provide insights and assistance in identifying ransomware infections. Participate in relevant forums, share details about the ransomware, and seek advice from knowledgeable individuals who may have encountered similar infections.
5: Seek Professional Assistance
If you cannot identify the ransomware variant, consider contacting cybersecurity professionals or companies specializing in ransomware analysis. They can help analyze the infection and provide guidance on potential recovery options.
Remember, correctly identifying the ransomware infection is essential for determining the availability of decryption tools, understanding the encryption algorithm used, and exploring the possibility of recovering your files.
STEP 4. Approaching Ransomware Virus to Identify It
In such cases, utilizing the ID Ransomware website is an effective approach to identifying the ransomware infection. Here’s how you can use it:
1: Access the ID Ransomware website
Visit the ID Ransomware website at https://id-ransomware.malwarehunterteam.com/ using your web browser.
2: Upload the ransom note and/or an encrypted file
On the ID Ransomware website, you can upload either the ransom note, an encrypted file, or both if possible. Locate the files on your computer and upload them to the website.
3: Analyze the uploaded files
Once the files are uploaded, the ID Ransomware website will analyze them to determine the ransomware variant if it is known. This analysis typically occurs automatically and may take a few moments.
4: Review the results
After the analysis, the ID Ransomware website will provide a video overview of the results, including the identified ransomware variant, information about the infection, and potential decryption options, if available.
The ID Ransomware website supports many ransomware infections and is regularly updated with new variants. It’s a valuable resource for quickly identifying the ransomware type affecting your system.
Remember to upload both the ransom note and an encrypted file if possible, as it helps improve the accuracy of the identification process.
The ID Ransomware website is a powerful tool for identifying various ransomware infections. You can quickly determine the ransomware variant and gather important details by uploading the ransom note or an encrypted file. Here are examples of identified ransomware infections using the ID Ransomware website:
Example 1: Qewe [Stop/Djvu] ransomware
- This example shows the identification of the Qewe ransomware, also known as Stop/Djvu. The website successfully recognizes the ransomware variant and provides relevant information, such as the malware family and whether it is decryptable. This information helps victims understand the nature of the infection and assess their options for potential decryption.
Example 2: .iso [Phobos] ransomware
- In this example, the ransomware infection is identified as the .iso variant of the Phobos ransomware. The ID Ransomware website recognizes the specific variant and provides details about it. This information can guide victims in their search for decryption options and understanding the characteristics of the ransomware.
Suppose the ID Ransomware website does not support the ransomware variant affecting your data. In that case, you can still search the internet using specific keywords related to the ransom message, decrypt file title, file extension, contact emails provided by the attackers, or crypto wallet addresses mentioned in the ransom note. This broader search approach may help you find relevant information or specialized forums where others may have encountered the same ransomware variant and can provide further insights or assistance.
Remember, the identification process is crucial for understanding the specific ransomware infection you are dealing with, which can inform your decisions regarding recovery options, contacting authorities, or seeking expert help.
STEP 5. Searching for Ransomware Decryption Tools
To search for decryption tools and increase your chances of recovering all your encrypted files, the No More Ransom Project is an excellent resource. Here’s how you can use it:
1: Visit the No More Ransom Project website
Access the No More Ransom Project website at https://www.nomoreransom.org/.
2: Access the “Decryption Tools” section
Navigate to the “Decryption Tools” section of the website. You can usually find it in the main navigation menu or through a prominent link on the homepage.
3: Enter the name of the identified ransomware
Using the name of the ransomware infection you identified earlier through the ID Ransomware website, enter it into the search bar provided on the “Decryption Tools” page.
4: Review available decryptors
After entering the name of the ransomware, the No More Ransom Project website will display a list of available decryptors, if any are available for the specific ransomware variant. Each decryptor will have details regarding which ransomware family it targets and which variants it can only decrypt files. Follow the instructions provided to download and use the decryptor tool.
Remember that not all ransomware variants have publicly available decryption tools. The availability of decryptors depends on the specific ransomware family and any successful efforts by cybersecurity organizations and law enforcement agencies to develop decryption methods. If a decryptor is not available for your specific ransomware variant, it’s important to focus on other recovery options, such as data backups or seeking professional assistance.
The No More Ransom Project collaborates with cybersecurity experts, law enforcement agencies, and organizations to provide decryption tools and information to assist ransomware victims. It’s a valuable initiative to combat the growing ransomware threat and help individuals recover their encrypted data.
STEP 6. Restoring Files with Data Recovery Tools
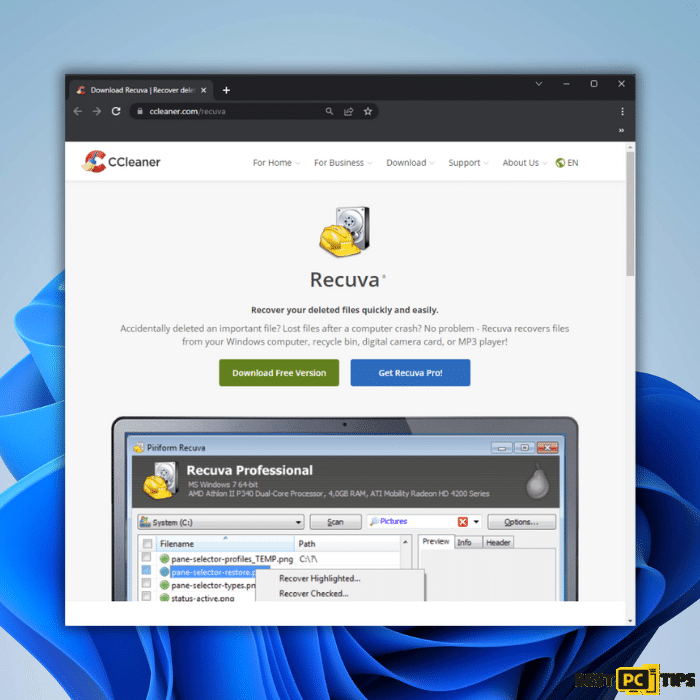
Restoring your encrypted files using data recovery tools can be a potential solution, depending on the circumstances of the ransomware infection. Recuva, a tool developed by CCleaner, is a popular choice for data recovery. Here’s a step-by-step guide on how to first recover encrypted files and use Recuva:
1: Perform a scan
1. Start by launching the Recuva application on your computer.
2. Follow the instructions provided by the Recuva wizard that appears. You will be asked to select the file types you want to recover. Choose the specific file types you want, such as documents, images, videos, etc. Alternatively, you can select the “All Files” option to scan for all types of files.
3. Next, you will be asked to choose the location to scan. Select the drive or specific folder where the encrypted files were originally located. If you’re unsure, you can scan the entire system drive.
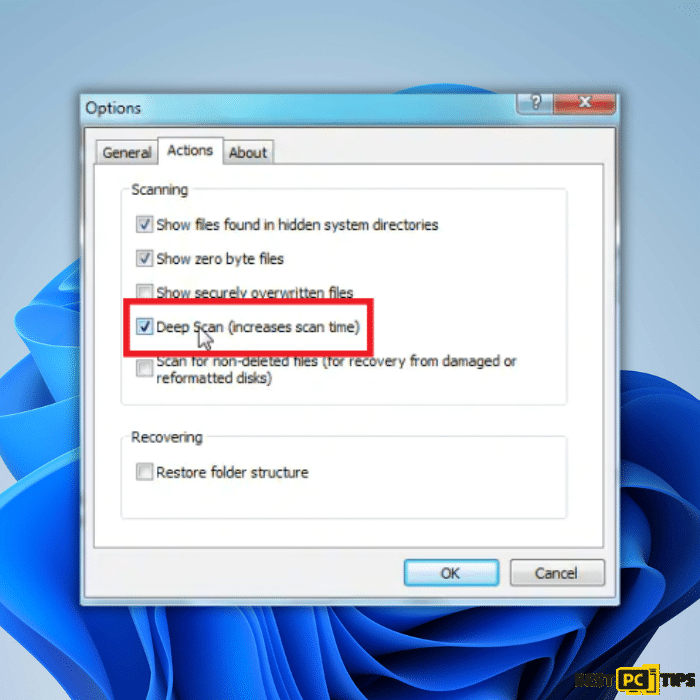
4. Enable the “Deep Scan” option for a more comprehensive scan. This may take longer but can increase the chances of recovering encrypted files.
5. Click the “Start” button to initiate the scanning process.
6. Wait for Recuva to complete the scan. The scanning duration depends on the size and complexity of the selected scan location. Larger volumes of data may take more time to scan, so be patient during the process.
7. Avoid modifying or deleting files during the scan, which may interfere with recovery.
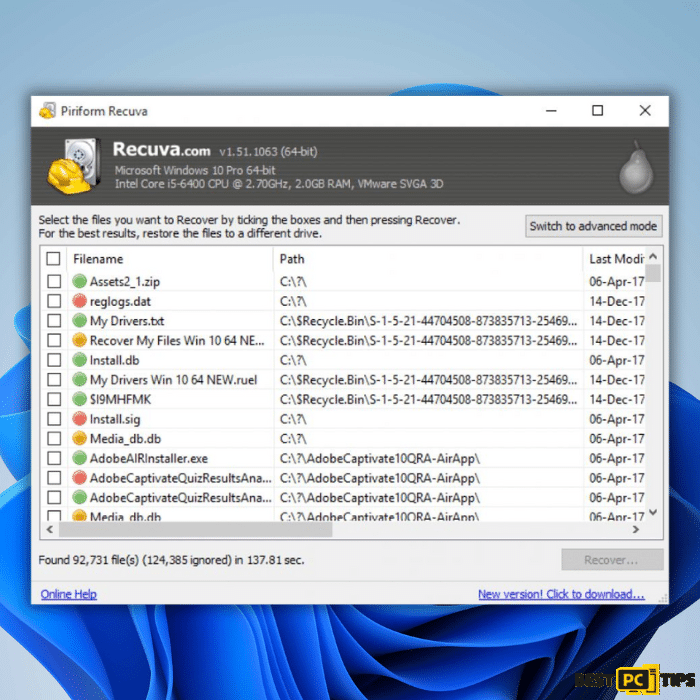
Once the scan is complete, Recuva will present you with a list of recoverable files. You can browse the list of recovered files and select the files you want to restore. Choose a safe and separate storage location to save the recovered files to avoid overwriting them.
Please note that the effectiveness of data recovery tools like Recuva may vary depending on the encryption used by the ransomware and the extent of damage to the encrypted files. It’s always recommended to have regular backups of your important data to minimize the impact of a ransomware attack.
Additionally, if the encrypted files are critical or the recovery process seems complex, it’s advisable to seek professional assistance from a reputable cybersecurity firm or data recovery service. They have specialized tools and expertise to handle more complex cases of data restoration.
You can try this method to decrypt zpps files and recover all your files:
2: Recover Data
Once the scan to recover your files is complete, and Recuva has generated a list of recoverable files, you can proceed to recover the data you wish to restore.
Here’s how to do it:
From the list of recoverable files in Recuva, browse through the folders and files to locate the data you want to recover. You can use the search bar or sorting options to help you find specific files or file types.
1. Select the checkboxes next to the files or folders you wish to recover. If you want to recover all files, select the checkbox at the top to mark all files.
2. Choose a safe and separate location to save the recovered files. It is important to avoid saving the recovered files to the same drive or partition from which they were recovered to prevent overwriting data and potential data loss. Select a different drive, external storage device, or network location to store the recovered files.
3. Click the “Recover” button to start the recovery process. Recuva will prompt you to choose a location for the recovered files. Navigate to the desired location and click “OK” to initiate the recovery.
4. Wait for Recuva to complete the recovery process. The duration will depend on the size and number of files being recovered. Be patient and avoid interrupting the process.
5, Once the recovery process is finished, you can navigate to the chosen location to access your recovered files downloaded there. Remember to review and verify the recovered files for their integrity and usability.
STEP 7. Creating Data Backups
Remember to schedule regular backups, keep your backup devices up to date, and test the restoration process periodically to ensure the integrity and availability of your backed-up data.
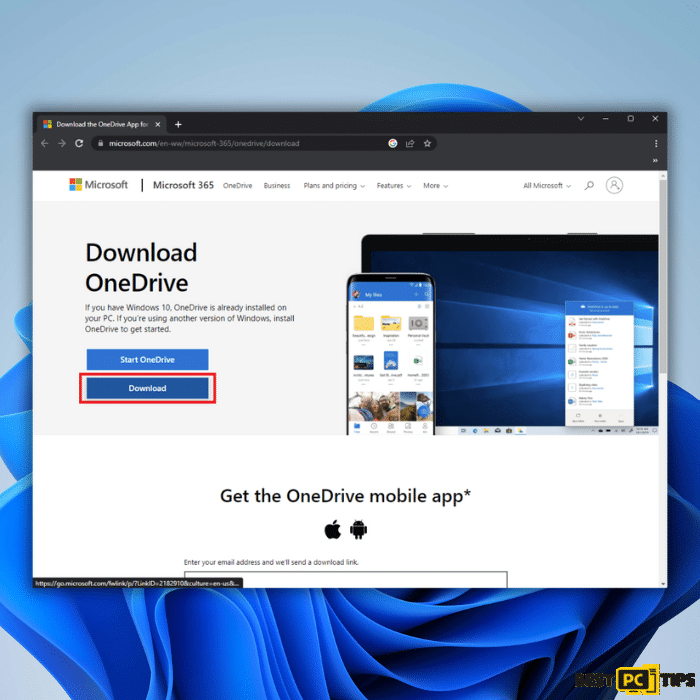
1: Install and set up Microsoft OneDrive:
1. Download and install the Microsoft OneDrive application on your computer.
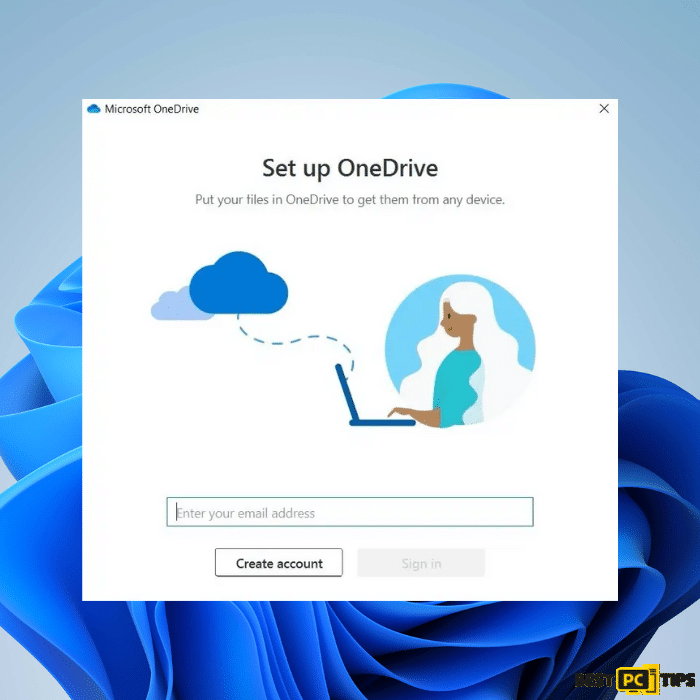
2. Sign in to OneDrive using your Microsoft account, or create a new account if you don’t have one.
2: Choose files/folders to back up
- By default, OneDrive automatically syncs files from your Desktop, Documents, and Pictures folders. You can choose to back up additional folders by manually selecting them.
3: Manual file backup
1. Open File Explorer and navigate to the file or folder you want to back up.
2. Right-click on the file or folder and select “Copy”.
3. Go to the OneDrive folder on your computer.
4. Right-click inside the OneDrive folder and select “Paste” to create a file or folder backup.
4: File synchronization and status
OneDrive will automatically sync the files you’ve selected for backup to the cloud.
1. In the OneDrive folder, you’ll see different icons indicating the status of the files.
2. A green checkmark indicates that the file is synced and up to date locally and on OneDrive.
5: Accessing files online
You can access your backed-up files online by visiting the OneDrive website.
1. Go to the OneDrive website, sign in with your Microsoft account, and you’ll be able to view and manage your files stored in OneDrive.
2. Regularly check your backup settings and ensure that important files and folders are backed up to OneDrive. It’s also a good practice to periodically verify that your backup files are intact and accessible.
Please note that the actual steps and options may vary slightly based on the version of OneDrive and the operating system you’re using.
Isolate Data By Managing Partitions
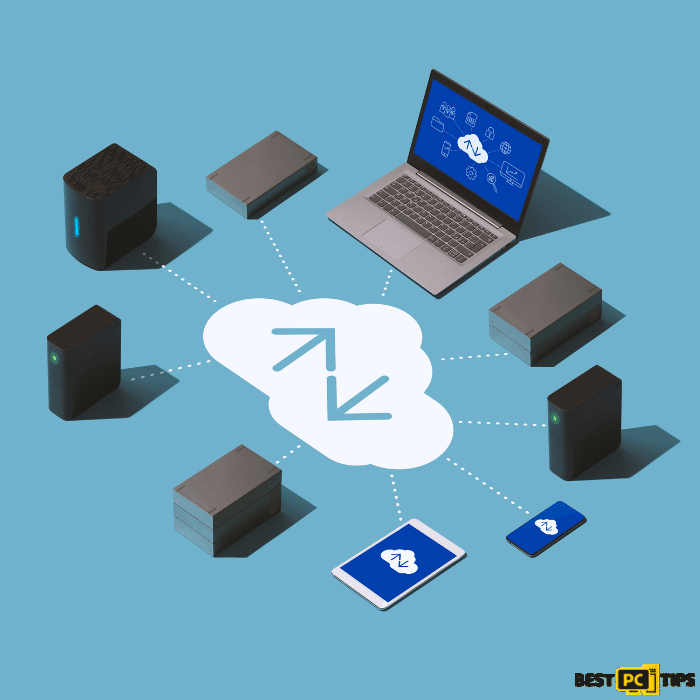
Consider creating multiple partitions on your storage device and storing important files on separate partitions. By isolating your data from the operating system partition, you can minimize the risk of losing data if you need to format the system drive due to malware infections or other issues. Managing partitions is typically done during the installation of the operating system, or you can use disk management tools available in the operating system.
Conclusion
In conclusion, the revelation of the Zpps ransomware has exposed a sinister extortion scheme that poses a grave threat to individuals and organizations. With its sophisticated tactics and ruthless precision, Zpps has demonstrated its ability to wreak havoc and leave victims grappling with devastating consequences. As the dark web marketplace for ransomware evolves, cybersecurity experts, authorities, and individuals must remain vigilant and proactive in defending against such malicious attacks. By understanding the inner workings of Zpps ransomware, methods, and motives, we can arm ourselves with the knowledge needed to bolster our defenses and protect against these insidious threats. You can always purchase a decrypt tool to remove malicious programs in moments.
Additionally, exploring resources such as the video overview decrypt tool is crucial, which can provide valuable insights and potential solutions for a ransomware attack. Reporting such incidents promptly to authorities further contributes to the collective effort to combat cybercrime. The battle against ransomware is ongoing, but through collective efforts, increased awareness, and robust cybersecurity measures, we can strive to outsmart and overcome the sinister forces that seek to exploit our digital lives.
iolo System Mechanic® — is a patented PC & MAC repair tool & the only program of its kind. Not only it’s a registry fix, PC optimizer, or an anti-virus/malware remover – The iolo System Mechanic® technology reverses the damage done to Windows or Mac, eliminating the need for time-consuming reinstallations & costly technician bills.
It is available for FREE. Although, for some more advanced features & 100% effective fixes you may need to purchase a full license.
If the Zpps virus is still not removed — don’t hesitate and contact us via email, or a Facebook messenger (the blue ‘bubble’ on the bottom-right of your screen).
Offer
iolo System Mechanic® — is a patented PC & MAC repair tool & the only program of its kind. Not only it’s a registry fix, PC optimizer, or an anti-virus/malware remover – The iolo System Mechanic® technology reverses the damage done to Windows or Mac, eliminating the need for time-consuming reinstallations & costly technician bills.
It is available for FREE. Although, for some more advanced features & 100% effective fixes you may need to purchase a full license.
If the Zpps virus is still not removed — don’t hesitate and contact us via email, or a Facebook messenger (the blue ‘bubble’ on the bottom-right of your screen).

